Operational excellence — the ability to deliver with speed, quality, and efficiency — is no longer about process optimization alone. It’s about how effectively an organization captures, governs, and leverages data. Increasingly, it’s also about how intelligence and automation are infused into daily operations to unlock agility and resilience.
In this post, we’ll explore how organizations can build operational excellence through a data-first approach.
Redefining Operational Excellence in the Age of Data
Traditionally, operational excellence was framed around lean processes, cost control, and continuous improvement frameworks. These remain important, but the definition has expanded.
Today, operational excellence means:
Running on trusted, real-time data instead of gut instinct
Embedding data-driven intelligence into decisions and workflows
Creating a data culture where teams can act on insights, not wait for reports
In short: Data is the foundation. Intelligence is the accelerator.
The Data Journey to Operational Excellence
Here’s the roadmap organizations can follow to build operational maturity:
1. Capture the Right Operational Data
You can’t optimize what you can’t measure. For most organizations, this means integrating:
ERP and supply chain data
CRM and customer experience data
IoT/sensor data from machines, warehouses, or logistics
Workforce and productivity data
Diverse, high-quality data is the starting point.
2. Elevate Data Governance & Quality
Governance isn’t bureaucracy — it’s the backbone of trustworthy insights.
Standardization ensures systems and analytics perform reliably
Without this, analytics and automation become liabilities rather than assets.
3. Integrate and Break Down Silos
Operational data is often scattered across functions. The goal is to connect the dots:
Data platforms that unify ERP, CRM, and IoT data
APIs that connect external and partner ecosystems
Data hubs or meshes that make data accessible across teams
When silos fall, cross-functional intelligence rises.
4. Apply Analytics for Insightful Decisions
Analytics is the bridge between data and action:
Descriptive analytics → “What happened?”
Diagnostic analytics → “Why did it happen?”
Predictive analytics → “What’s likely to happen next?”
Prescriptive analytics → “What should we do about it?”
Analytics should be seen not just as dashboards, but as a decision engine for the enterprise.
5. Infuse Automation & Intelligence
This is where operational excellence scales:
Predictive maintenance using IoT data
Demand forecasting to strengthen supply chain planning
Automated decisioning in logistics, scheduling, or workforce planning
Natural language tools that give every employee access to insights
The goal is to embed intelligence into the flow of work, not bolt it on afterward.
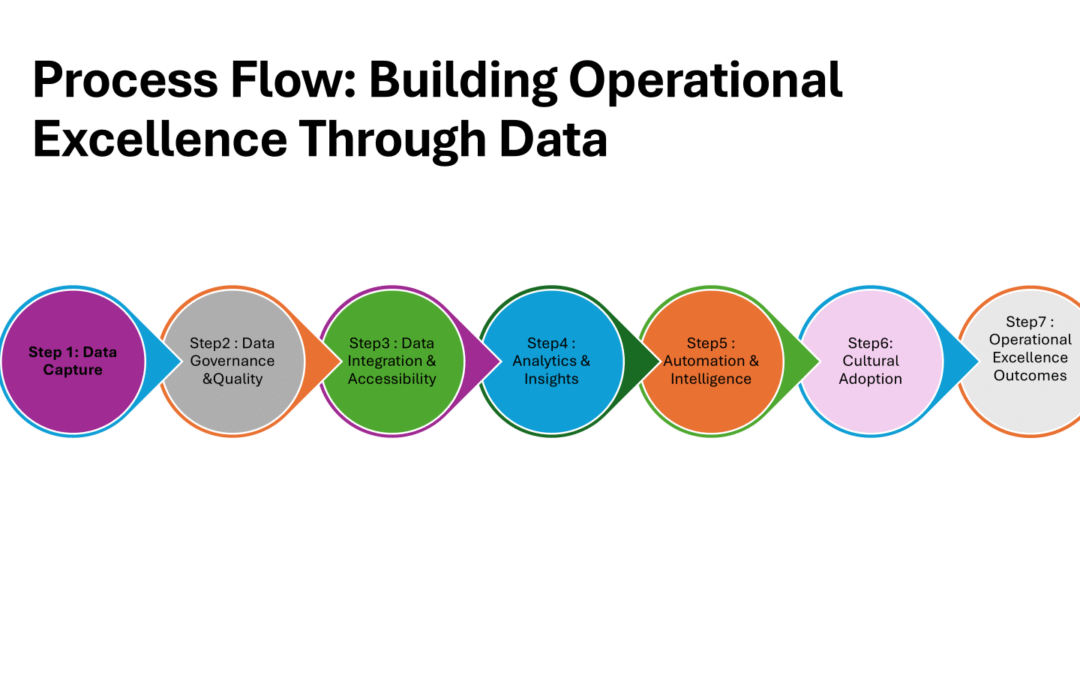
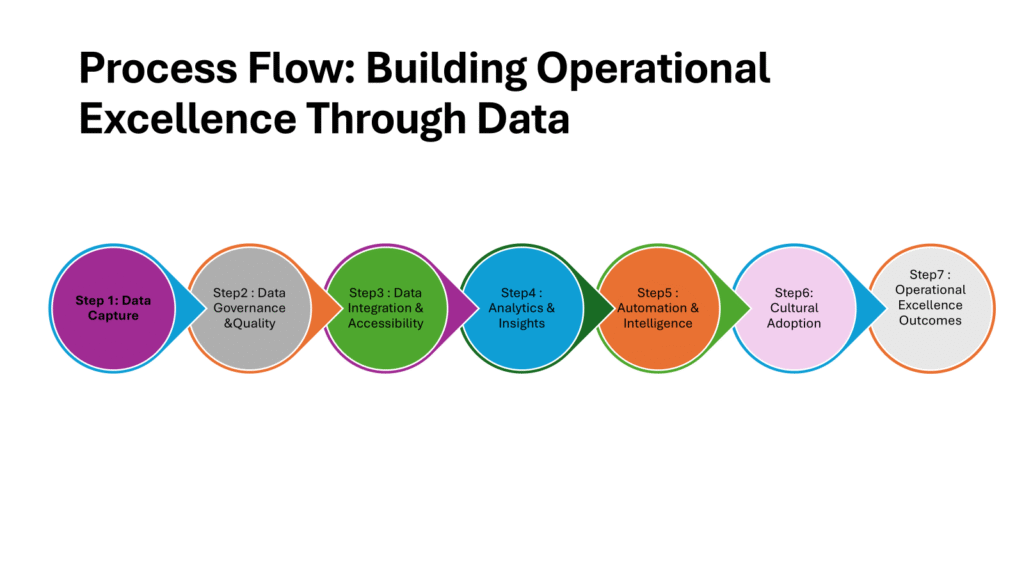
Step 1: Data Capture
Collect from ERP, CRM, IoT, workforce, external sources
Ensure completeness and relevance
Step 2: Data Governance & Quality
Standardize definitions
Apply compliance & privacy rules
Cleanse and validate data
Step 3: Data Integration & Accessibility
Connect siloed systems (ERP, CRM, IoT)
Use APIs, data hubs, or meshes
Enable enterprise-wide access
Step 4: Analytics & Insights
Descriptive (what happened)
Diagnostic (why it happened)
Predictive (what will happen)
Prescriptive (what should we do)
Step 5: Automation & Intelligence
Predictive maintenance
Demand forecasting
Automated decisioning
Self-service data tools
Step 6: Cultural Adoption
Data literacy across teams
Embed insights into workflows
Encourage trust & usage
Step 7: Operational Excellence Outcomes
Greater efficiency
Agility in response
Improved customer experience
Resilience & innovation
From Process to Practice
While the process flow lays out the technical journey of capturing, governing, and activating data, true operational excellence depends on how consistently these steps are practiced across the organization. A well-designed data architecture or analytics platform delivers little value if the insights don’t reach the right people, at the right time, in the right context. This is where the transition from systems and processes to people and culture becomes essential. Technology can streamline operations, but only a culture that values data-driven decision making ensures those improvements are sustained and scaled.
Building a Data-First Culture
Technology alone won’t deliver excellence. It’s about people and culture.
Leaders must champion data literacy at all levels.
Teams must feel empowered to use data in real-time decisions.
Success stories should be shared to reinforce a culture of trust in data.
As the saying goes: Data can’t replace judgment, but it can sharpen it.
Benefits of Data-Driven Operational Excellence
Organizations that take this journey see measurable results:
Efficiency → lower costs, less downtime, optimized resources
Agility → faster response to disruptions or opportunities
Hostinger is known for its reliable and affordable web hosting services, making it an excellent choice for hosting your WordPress website. Whether you’re a beginner or an experienced web developer, Hostinger’s user-friendly interface and features make setting up a WordPress site quick and straightforward.
In this guide, we’ll walk you through how to set up a WordPress website using Hostinger.
Before you start building your website, you need to choose a hosting plan. Hostinger offers several plans tailored to different needs, but the Shared Hosting plan is ideal for beginners and small businesses.
Select Your Hosting Plan: Click on the “Web Hosting” tab, and choose the plan that suits you. For WordPress websites, the WordPress Hosting plan is a good choice.
The most common plans are the Single Shared Hosting, Premium Shared Hosting, and Business Shared Hosting.
Complete Your Purchase: Choose your plan, select a domain name, and proceed to checkout. If you already have a domain, you can use it by pointing it to Hostinger
Step 2: Install WordPress on Hostinger
Hostinger provides a one-click WordPress installation, making it easy to get started.
Log in to Hostinger: Once you’ve completed your purchase, log in to your Hostinger account.
Access Your hPanel: The Hostinger dashboard (hPanel) is where you manage your hosting settings.
Go to Auto Installer: In the dashboard, click on the “Website” section and then find the Auto Installer icon.
Install WordPress: Click on WordPress in the Auto Installer, enter your website details like site name, admin username, and password.
Click Install: After filling in the details, click Install to automatically install WordPress on your domain.
Once the installation is complete, Hostinger will provide you with login details to access your WordPress admin panel.
Step 3: Access Your WordPress Dashboard
Log in to WordPress: Go to yourdomain.com/wp-admin (replace “yourdomain.com” with your actual domain name).
Enter Your Admin Credentials: Use the credentials you set up during the WordPress installation process to log in.
You will now have access to the WordPress dashboard, where you can start designing your website.
Step 4: Choose a WordPress Theme
The theme of your website plays a critical role in its overall look and functionality. WordPress offers thousands of free and premium themes. Hostinger also has a custom theme builder that integrates with WordPress.
Go to Appearance > Themes: In the WordPress dashboard, navigate to Appearance and select Themes.
Browse Themes: You can choose from free themes listed in the WordPress theme repository or upload a premium theme if you have one.
Install a Theme: Click on Add New to browse through themes, and click Install to activate the one you like.
For a professional website, you may want to explore premium themes available through marketplaces like ThemeForest or Elegant Themes.
Step 5: Customize Your Website
Access the Customizer: Go to Appearance > Customize to make changes to the design of your website.
Edit Your Site’s Identity: Change the website name, tagline, logo, and favicon (site icon) from the Site Identity section.
Set Your Colors and Fonts: Choose your website’s colors and fonts to match your brand’s identity. You can also add custom CSS if needed.
Configure Widgets: Add widgets to your sidebar or footer through Appearance > Widgets to display recent posts, social media links, and more.
Step 6: Install Essential Plugins
Plugins are one of the most powerful aspects of WordPress. They allow you to add functionality to your website without having to code. Hostinger offers easy access to popular plugins in the WordPress Admin Panel.
Go to Plugins > Add New: In the WordPress dashboard, navigate to Plugins and select Add New.
Install Recommended Plugins:
Yoast SEO: For SEO optimization.
WooCommerce: If you want to set up an online store.
Elementor: For drag-and-drop page building.
UpdraftPlus: For backups.
Akismet Anti-Spam: For comment moderation.
Simply search for the plugin and click Install Now, then Activate.
Step 7: Create Pages and Content
Create Key Pages: Every website should have certain key pages, such as:
Home
About Us
Contact
Services/Products
Blog
To create a page, go to Pages > Add New, and use the WordPress editor to add text, images, and multimedia.
Start Blogging: If you want to include a blog on your website, navigate to Posts > Add New and start creating blog posts. Blogging is an excellent way to generate traffic through SEO.
Step 8: Set Up SEO Settings
To ensure your website ranks well in search engines, you’ll need to configure SEO settings:
Install an SEO Plugin: As mentioned, Yoast SEO is a popular choice. It helps you optimize pages, posts, and media.
Add Meta Tags: Use Yoast to add custom meta titles and descriptions for each page to help search engines understand your content.
Generate XML Sitemap: Yoast can automatically generate a sitemap that you can submit to search engines.
Step 9: Set Up Security Features
To keep your website secure, consider these steps:
Install a Security Plugin: A plugin like Wordfence can help protect your website from hacking attempts and malware.
Enable SSL: Hostinger provides free SSL certificates for your domain. Enable SSL to make your website HTTPS secure.
Update Regularly: Regularly update WordPress, themes, and plugins to avoid security vulnerabilities.
Step 10: Launch Your Website
Once your website is designed and content is added, you’re ready to launch! Before going live:
Check for broken links and ensure all pages are working properly.
Preview your website to ensure everything looks good on desktop, tablet, and mobile.
Announce the launch: Share your new site on social media and other platforms to drive traffic.